
Friday, September 30, 2011


Thursday, September 29, 2011
A kiss with the fist is better than none
Put on your fanciest dancy pants, kids! You're about to feel urge to shake your groove thing...
I adore Florence Welch :)
Linked with Goodnight Moon
Tuesday, September 27, 2011
Lovely book page DIY
There is something really beautiful about an old book. Seeing the
spine all torn up, knowing that somebody really loved it & the fact
that should you not actually care to read said book... you can turn the
pages into some pretty sweet things! It's all about recycling, kids!
I picked up this old crusty well loved book
at my local Goodwill for one dollar. Sorry, Marguerite Steen, I'm sure
your story is lovely, but I have other plans for this bad boy!
All you need for this project is some old book pages, a glue gun and scissors!

Make a paper chain!

Who doesn't love an old fashioned paper chain? This lady right here does, for sure.
To make sure my links were all the same width, I folded a few of the
pages together and trimmed away all of the blank edges except for the
side that was bound in the spine. I decided I wanted mine to be a
little more understated than the average paper chain, so I went with
smaller strips of paper(three lines of text wide). You could go larger
if you wanted! With the pages still sandwiched together, I cut until i
was half way through the blank space near the spine & then chopped
all the blank space left on that one side off. Now you have your
perfectly even strips! Clearly, the next step is to start looping those
bad boys together. I used hot glue because I like instant
gratification, but craft glue would work just fine!

How great would this be for a book loving couples wedding, a graduation party or just draped along your book shelf?


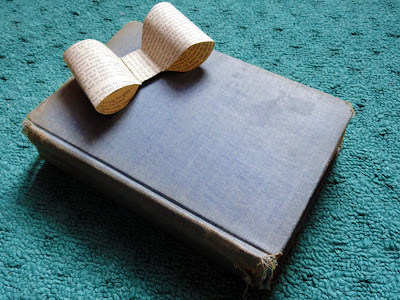
Turn it into gift wrap!
Now, clearly you could
wrap something small up in an actual book page, but i'm going to show
you how to make a quick gift bow with it!

Pull
two pages from the center spine. Chop off the bottom blank space and
then make another cut about 15-20 lines up the page.

Toss
the blank space and set aside the larger top portion. Take that 15-20
line portion and bring the blank edges together and glue. Now fold that
in half and trim the sides to make your bow shape. Unfold and chop a
strip off of the larger top portion you set aside a minute ago, wrap it
around the center of your bow and glue. Now fluff it up a bit &
voila! Instant gift bow!

This project will take you less time to accomplish than reading the tutorial did!
That old book never looked so good!
[these projects were first shared by moi over at Indie Pretty... I just want to keep track of them over here & make sure I get to share them with y'all too!]
Monday, September 26, 2011
I made that!
Photo Challenge Day... I don't know anymore: Something I made
I make things. Did you know that? It's what I do!


I love them all so much! Snag your own in my SHOP!
Thursday, September 22, 2011
I am from...

from exit 80 and you're almost there.
I am from crayolas and printer paper,
from lipstick kisses on my hand and Just A Wish Away.
I am from bayou water and rain boots,
his eyes and her heart.
From playing until the sun goes down and tears when it comes back up.
I am from chicory and magnolia,
Mud pies in the oven and front porch swings.
I am from blue skies and broken hearts.
I did this in a writing course once & decided to just use it instead of following the template provided. Ooooooo weeeee, I'm a rebel woman!
Mama's Losin' It- Writer's Workshop


Subscribe to:
Posts (Atom)
MEET LACEY

wife of a cute fella, mama to a sweet girl, creator of all things cute, consumer of too much caffeine & lover of a good bargain
POPULAR POSTS
-
 Giveaways Feb. 20-24th, 2012! If you're here from Pinterest, Welcome! I hope you'll take a look around and follow along! Tha...
 -
 I realized the other day that it's been a while since I shared some of my journaling with you folks! So here are a few ;) Dear Journal: ...
 -
 I was recently sent a neck travel pillow & strap covers from Lou Bugs Boutique to review. Now clearly, I am not a little one so I ca...
 -
 * all of the photos in this post are links, click them to go to the item or shop Julie was one of the first lovely people to sponsor m...
 -
 I promised a "Because I Love You" giveaway & am finally getting a chance to post it! Life took over for a bit, but I'm go...
 -
 SpRiNg fLiNg with my Sitstas! It's giveaway time! I have a few Easter goods to giveaway to get your house prepped for Spring! The little...
 -
 Eeeeee! 3 months! This month, Posey's little personality really started to shine. She is such a happy baby! Her first giggle c...
 -
Today I am teaming up with Shabby Apple for a fabulous $50 gift card giveaway! Gift card giveaways are the best because you can choose wh...
-
Winner(s) are up! Scroll down or click here! It's that glorious time of week again... Let the De-Funking begin! As Always, click the ...
-
 Friday night you took me to dinner at the same restaurant we had visited for our first dinner date; A place that is set back in the woo...